3Ds Max Task - Furniture
3Ds Max task.
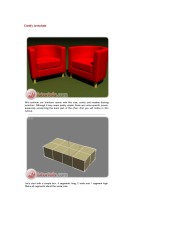
Comfy Armchair
We continue our 'furniture' series with this nice, comfy and modern-looking armchair. Although it may seem pretty simple, there are some specific issues, especially concerning the back part of the chair, that you will notice in this tutorial.
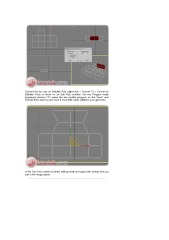
Let's start with a simple box, 4 segments long, 2 wide and 1 segment high. Make all segments about the same size.
Convert the box into an Editable Poly (right-click > Convert To > Convert to Editable Poly) or throw on an Edit Poly modifier. Go into Polygon mode (keyboard shortcut "4") select the two middle polygons on the "back" and Extrude them twice so you have 4 more little cubes added to your geometry.
In the Top View, switch to Vertex editing mode and adjust the vertices like you see in the image above.
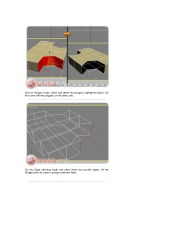
Back to Polygon mode, select and delete the polygons highlighted above. Do the same with the polygons on the other side.
Go into Edge selecting mode and select these two parallel edges. Hit the Bridge button to create a polygon between them.
Do the same with the edges on the other side.


